> For the complete documentation index, see [llms.txt](https://docs.ingestlabs.com/llms.txt). Markdown versions of documentation pages are available by appending `.md` to page URLs; this page is available as [Markdown](https://docs.ingestlabs.com/tag-manager/providers/providers-screen.md).
# Providers Screen
## Introduction
This section describes the Providers screen UI elements.
### Add Provider
To create a new Provider, click on the **Add Provider** option located at the top-right corner of the screen.
### Filter Providers
You can filter the Providers based on the following types:
* **Filter By Name**: Filters the providers based on the Provider name.
* **Filter By Attribute Value**: Filters the Providers based on Attribute Value.
* **Filter By Metadata Attribute**: Filters the Providers based on Metadata Attribute.
### Adjust Providers View Per Page
You can adjust the number of providers displayed per page using the dropdown menu located at the top-right corner of the screen.
* **50 per page**: Displays up to 50 providers on the current page.
* **100 per page**: Displays up to 100 providers on the current page.
* **200 per page**: Displays up to 200 providers on the current page.
### Additional Fields on the Providers Screen
The following are the additional fields that appear on the Providers screen.
| Column Name | Description |
| ----------- | ------------------------------------------------------------------------------------------------------------------------------------------------------------------------------------------------------------- |
| Name | Denotes the Provider Name. |
| Support | Denotes whether the Provider is a server-side or a browser-side setting. |
| Status |
Denotes the status of the Provider. • Production: The Provider is in Production status. • Staging: The Provider is in Staging status. • Pending Publish: The Provider is yet to be Published.
|
| Type | Denotes the type of the Provider. For example, IMG, JS, and so on. |
| Created By | Denotes the user who created the Provider. |
| Updated By | Denotes the user who updated the Provider. |
| Updated On | Denotes when the Provider is last updated. |
| Add Tag | You can create the tag using this option from the Providers. |
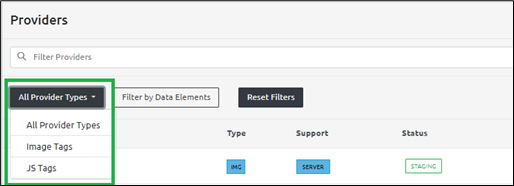
### All Provider Types
The **All-Provider Types** drop-down menu displays the following provider types:
* All Provider Types
* Image Tags: Providers that use image-based tracking.
* JS Tags: Providers that use JavaScript for tracking.
### Filter By **Data Elements**
The **Filter By Data Elements** option filters the Data Elements based on the Data Element selected.
The *Choose Data Elements* panel opens.
You can either:
* Use the **Search bar** at the top to find specific Data Elements, or
* Browse through the two available tabs:
* **User Defined**: Custom Data Elements created by users.
* **Default**: Predefined Data Elements available in the system.
Note: You can choose a combination of both *User Defined* and *Default* Data Elements.
Deselect: To remove a selected Data Element, click the small **x** icon next to it.
Refresh: Click the Refresh button to load the most recent Data Elements.
A **Fetching Data Elements...** message appears while the system retrieves and displays the updated data.
Once you’ve finished selecting, click the **Done** button to apply your choices.
### Reset Filters
The **Reset Filters** option resets the applied filters.
### Refresh the Provider Screen
**Refresh Button**\
The Refresh button allows you to reload the Providers screen. If you create new providers or update their properties and the changes are not immediately visible on the main UI screen, clicking the Refresh button will reload the page to display the most up-to-date information.
### Add Tag
Click the **Add Tag** button to add a new tag.
Note: For detailed steps on adding tags, please refer to the **Tags** section of this document.
{% embed url="" %}
---
# Agent Instructions
This documentation is published with GitBook. GitBook is the documentation platform designed so that both humans and AI agents can read, navigate, and reason over technical content effectively. Learn more at gitbook.com.
## Querying This Documentation
If you need additional information that is not directly available in this page, you can query the documentation dynamically by asking a question.
Perform an HTTP GET request on the current page URL with the `ask` query parameter, and the optional `goal` query parameter:
```
GET https://docs.ingestlabs.com/tag-manager/providers/providers-screen.md?ask=&goal=
```
`ask` is the immediate question: it should be specific, self-contained, and written in natural language.
`goal` is optional and describes the broader end goal you are ultimately trying to accomplish on behalf of the user. GitBook uses it to tailor the answer towards what is most useful for that goal.
The response will contain a direct answer to the question and relevant excerpts and sources from the documentation.
Use this mechanism when the answer is not explicitly present in the current page, you need clarification or additional context, or you want to retrieve related documentation sections.