> For the complete documentation index, see [llms.txt](https://docs.ingestlabs.com/llms.txt). Markdown versions of documentation pages are available by appending `.md` to page URLs; this page is available as [Markdown](https://docs.ingestlabs.com/media-data-platform/segments/add-a-new-segment.md).
# Add a New Segment
To add a new **Segment**, follow these steps:
**Step 1**: From the left navigation panel, select **Segments**.
**Step 2**: Click **Add Segment** on the top-right corner of the screen.
**Step 3**: Enter the **Segment Name** into the **Name** field and the **Description** into the **Description** field.
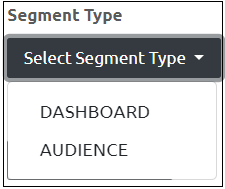
**Step 4**: Under **Segment Type**, the following options are available:
* DASHBOARD - Used to create a segment for dashboard analysis.
* AUDIENCE - Used to create a segment for targeting specific users or audiences.
**4.1:** Click **DASHBOARD**
The following options are available under the **Context** dropdown. Select the appropriate one.
* **Attribution**: Define the specific parameters or conditions you want to include in the segment.
* **Conversion Comparison with CRM Data** – Compares conversion metrics with CRM records for analysis.
* **User Visits** – Shows statistics on user visits and interactions.
* **Site Performance Report**: Displays key metrics related to your website’s performance, such as traffic, load time, and user engagement.
* **User Events**: Shows detailed information about user actions, such as clicks, downloads, and form submissions.
* **Ad Insights**: Provides performance data for your advertising campaigns.
* **KPI Metrics**: Displays key performance indicators for tracking business goals.
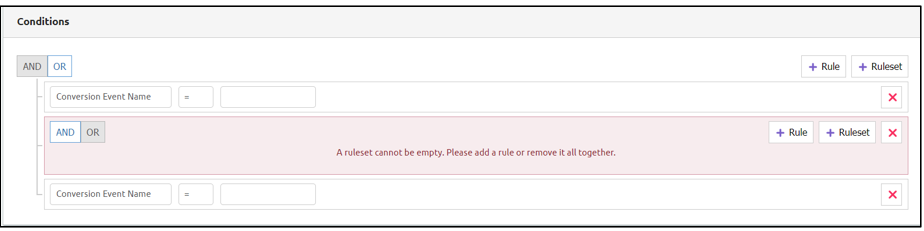
**Step 4.1.1:** Add the **Conditions** using the **Rule** and **Ruleset** options. Use the **AND** and **OR** options as appropriate to define the logic.
**Adding Conditions Using Rules and Rulesets**
* **Select the Logical Operator:**
* Choose **AND** or **OR** to define the logical relationship between conditions.
* **Add a Rule:**
* Click **+ Rule** to define a condition, such as *Conversion Event Name* with a specific value.
* **Add a Ruleset:**
* Click **+ Ruleset** to group multiple rules together under a nested condition.
* **Ensure Rulesets Are Not Empty:**
* If a ruleset is empty, an error message appears:\
\&#xNAN;*"***Ruleset cannot be empty** Please add a rule or remove it altogether."
* **Remove Unwanted Rules or Rulesets:**
* Click the **X** icon next to a rule or ruleset to delete it.
**Step 4.2**: Click **AUDIENCE**.
These are the options available under the **Context** dropdown. Select the appropriate one:

* **Attribution**: Helps identify which channels or campaigns contributed to conversions or user actions, allowing you to measure performance effectively.
* **Conversion Comparison with CRM Data**: Compares audience conversions with CRM data to identify trends and performance gaps.
* **User Visits**: Displays audience visit details, including frequency, duration, and interaction patterns
* **Site Performance Report**: Shows how the website performs for different audience groups based on traffic and engagement metrics.
* **User Events**: Tracks specific user actions, such as clicks, downloads, or form submissions.
* **Ad Insights**: Provides detailed data on how your audience interacts with advertisements.
* **KPI Metrics**: Displays key performance indicators to measure audience-related goals and outcomes.
**Step 4.2.2**: Date Range
Under the **Start Date** section, choose a **Quick Select** option. The following options are available:
* **Beginning of Yesterday**: Sets the start date to the beginning of the previous day
* **Beginning of Week**: Sets the start date to the first day of the current week.
* **Beginning of Month**: Sets the start date to the first day of the current month.
* **Beginning of Year**: Sets the start date to the first day of the current year.
* **Custom**: Allows you to manually select a specific start date.
**Calculated Date Based on Current Date**:\
As you select the start and end dates, the system automatically calculates and displays the date range based on the current date.
Next, under the **End Date** section, you will see similar **Quick Select** options:
* **End of Yesterday**: Sets the end date to the end of the previous day.
* **End of Week**: Sets the end date to the last day of the current week.
* **End of Month**: Sets the end date to the last day of the current month.
* **End of Year**: Sets the end date to the last day of the current year.
* **Custom**: Allows you to manually choose a specific end date.
**Calculated Date Based on Current Date**:\
As you select the start and end dates, the system automatically calculates and displays the date range based on the current date.
**Step 4.2.3**: Add the **Conditions** using the **Rules** and **Ruleset** options. Use the **AND** and **OR** options as appropriate to define the logic.
**Adding Conditions Using Rules and Rulesets**
* **Select the Logical Operator:**
* Choose **AND** or **OR** to define the logical relationship between conditions.
* **Add a Rule:**
* Click **+ Rule** to define a condition, such as *Conversion Event Name* with a specific value.
* **Add a Ruleset:**
* Click **+ Ruleset** to group multiple rules together under a nested condition.
* **Ensure Rulesets Are Not Empty:**
* If a ruleset is empty, an error message appears:\
\&#xNAN;*"***Ruleset cannot be empty** Please add a rule or remove it altogether."
* **Remove Unwanted Rules or Rulesets:**
* Click the **X** icon next to a rule or ruleset to delete it.
**Step 5**: Click **Save** to save the segment details.
{% embed url="" %}
---
# Agent Instructions
This documentation is published with GitBook. GitBook is the documentation platform designed so that both humans and AI agents can read, navigate, and reason over technical content effectively. Learn more at gitbook.com.
## Querying This Documentation
If you need additional information that is not directly available in this page, you can query the documentation dynamically by asking a question.
Perform an HTTP GET request on the current page URL with the `ask` query parameter, and the optional `goal` query parameter:
```
GET https://docs.ingestlabs.com/media-data-platform/segments/add-a-new-segment.md?ask=&goal=
```
`ask` is the immediate question: it should be specific, self-contained, and written in natural language.
`goal` is optional and describes the broader end goal you are ultimately trying to accomplish on behalf of the user. GitBook uses it to tailor the answer towards what is most useful for that goal.
The response will contain a direct answer to the question and relevant excerpts and sources from the documentation.
Use this mechanism when the answer is not explicitly present in the current page, you need clarification or additional context, or you want to retrieve related documentation sections.