> For the complete documentation index, see [llms.txt](https://docs.ingestlabs.com/llms.txt). Markdown versions of documentation pages are available by appending `.md` to page URLs; this page is available as [Markdown](https://docs.ingestlabs.com/tag-manager/providers/add-a-new-provider-browser.md).
# Add a New Provider (Browser)
### Introduction
This document explains step by step how to add a provider to the browser side. All the information required for Client-side or Browser-side configuration is fetched from the webpage or browser.
### Procedure
To add a new Provider in Tag Manager, perform the following steps:
**Step 1:** From the left navigation panel, select **Providers**.
**Step 2:** Select **Add Provider -> For Browser** on the top-right corner of the screen.
**Step 3:** The **Provider Template** panel opens on the right side and choose a template from the list or use the **Search** bar to find a specific one.
Note: In the list, each template includes a label such as *IMG*, *JS*, or *APP*, indicating whether the provider uses an image-based, JavaScript-based, or app-based implementation.
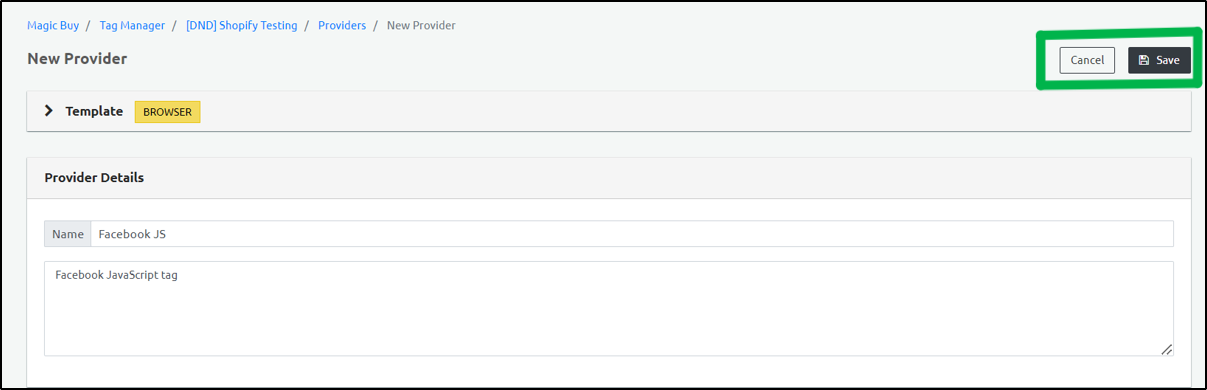
**Step 4:** Let us take an example of the **Facebook JS** provider template.
**Step 5:** Under **Provider Details**, the **Name** and **Description** fields will already be filled in.
**Step 6:** The Script section includes both the Template script and Provider script.

You can enter the JavaScript in the Provider Script section and click **Save** to save the changes.
**Step 7:** The **Attributes** section lists the Attributes for Data Elements and Transformers. This is an Optional section.
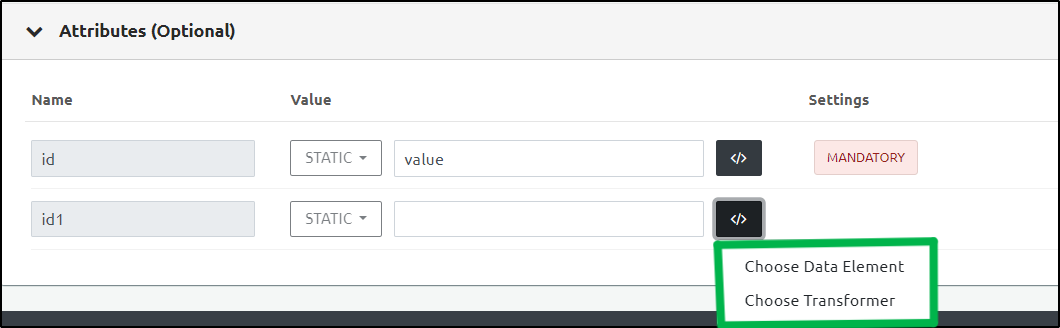
**Step 7.1:** Click **Choose Data Element.**
**Step 7.1.1:** The **Select Data Element** panel opens on the right side of the screen.
At the top of this panel, you’ll find a **Search Bar**.
You can either:
* Use the search bar to find a specific Data Element, or
* Choose from the list displayed under the two tabs:
* User-Defined
* Default
**Step Result:** The selected Data Element is visible in the Value section.
**Note:** To cancel the selected Data Element, click the small **x icon** next to the selected item.
**Step 7.1.2:** Attribute Settings
Under the Settings section, you can configure the following options for each attribute:
* Mandatory: Select this checkbox to make the value mandatory.
* Fatal: Select this checkbox to stop the process if the value is missing or invalid.
* Ignore If Empty: Select this checkbox to skip this value during processing if it is not set.
* Hash (SHA256): Select this checkbox to securely convert the value into a SHA256 hash before processing.
**Step 7.1.3:** Settings
Click the **Settings** option, the *Attribute Settings* window opens.
**Note:** All the attributes selected earlier will already be checked. If you want to make changes, you can update them here.
Under **Transformers**, you will find the **URL Encode** checkbox.\
Check this box if you want the value to be automatically encoded for safe transmission in a URL.
**Step 7.1.4:**Data Type Conversion
Click the **Data Type Conversion** drop-down.
The following options are available:
* No Conversion: Indicates that there is no conversion required for the data type.
* Convert to Boolean: Converts the input data to Boolean.
* Convert to Number: Converts the input data to a number.
* Convert to Array: Converts the input data to Array.
* Convert to Object Spread: Converts the JSON attributes under a parent level attribute to the root level attributes.
**Step 7.2:** Click **Choose Transformer.**
**Step 7.2.1:** The **Select Transformer** panel opens on the **right side** of the screen.
At the top of the panel, there is a **Search Bar**.\
You can either:
* Use the search bar to quickly find a Transformer, or
* Browse through the list displayed below and select a Transformer manually.
**Step Result:** The selected Transformer is visible in the Value section.
**Note:** To cancel the selected Transformer, click the small **x icon** next to the selected item.
**Step 7.2.2:** Attribute Settings
Under the Settings section, you can configure the following options for each attribute:
* Mandatory: Select this checkbox to make the value mandatory.
* Fatal: Select this checkbox to stop the process if the value is missing or invalid.
* Ignore If Empty: Select this checkbox to skip this value during processing if it is not set.
* Hash (SHA256): Select this checkbox to securely convert the value into a SHA256 hash before processing.
**Step 7.2.3:** Settings
Click the **Settings** option, the *Attribute Settings* window opens.
**Note:** All the attributes selected earlier will already be checked. If you want to make changes, you can update them here.
Under **Transformers**, you will find the **URL Encode** checkbox.\
Check this box if you want the value to be automatically encoded for safe transmission in a URL.
**Step 7.2.4:** Data Type Conversion
Click the **Data Type Conversion** drop-down.
The following options are available:
* No Conversion: Indicates that there is no conversion required for the data type.
* Convert to Boolean: Converts the input data to Boolean.
* Convert to Number: Converts the input data to a number.
* Convert to Array: Converts the input data to Array.
* Convert to Object Spread: Converts the JSON attributes under a parent level attribute to the root level attributes.
**Step 8:** Click **Save** on the top right to save the new Provider (Browser).
**Note**: The page displays the following success message.

{% embed url="" %}
---
# Agent Instructions
This documentation is published with GitBook. GitBook is the documentation platform designed so that both humans and AI agents can read, navigate, and reason over technical content effectively. Learn more at gitbook.com.
## Querying This Documentation
If you need additional information that is not directly available in this page, you can query the documentation dynamically by asking a question.
Perform an HTTP GET request on the current page URL with the `ask` query parameter, and the optional `goal` query parameter:
```
GET https://docs.ingestlabs.com/tag-manager/providers/add-a-new-provider-browser.md?ask=&goal=
```
`ask` is the immediate question: it should be specific, self-contained, and written in natural language.
`goal` is optional and describes the broader end goal you are ultimately trying to accomplish on behalf of the user. GitBook uses it to tailor the answer towards what is most useful for that goal.
The response will contain a direct answer to the question and relevant excerpts and sources from the documentation.
Use this mechanism when the answer is not explicitly present in the current page, you need clarification or additional context, or you want to retrieve related documentation sections.