> For the complete documentation index, see [llms.txt](https://docs.ingestlabs.com/llms.txt). Markdown versions of documentation pages are available by appending `.md` to page URLs; this page is available as [Markdown](https://docs.ingestlabs.com/tag-manager/alarms/add-a-new-alarm-tag-expiration-alarm.md).
# Add a New Alarm (Tag Expiration Alarm)
## Introduction
This option allows users to create a new Tag Expiration Alarm. It helps monitor tags and notifies users when a tag is about to expire, enabling timely action.
## Procedure
To add a new alarm, perform the following steps:
**Step 1:** Select **Alarms** from the left navigation panel.
**Step 2:** Click **Add Alarm** on the top-right corner of the screen.
**Step 3:** Select **Tag Expiration Alarm**.
**Step Result:** The New Tag Expiration Alarm screen appears.
**Step 4:** Enter the following details in the New Tag Expiration Alarm screen.
**Step 5:** In the **Name** field, enter the alarm name. In the **Description** field, enter the alarm description.
**Step 6:** In the Metadata Filters, select a key.
**Step 7:** Under the Enter Value field, enter the corresponding value.
**Step 8:** The entered values will appear under Selected Values.
**Step 9:** To clear the selected values, click Clear.
**Step 10:** To delete an entry entirely, click Delete.
**Note:** You can add multiple filters by clicking Add.
**Settings**
**Step 11:** Enter the details mentioned in the **Settings** section.
a. **Tag Expiry Lookback (in Days)**: Send tag expiration notification before the tag expires. You can choose five durations during which the alert should be sent. The number of days must be between 1-180.
b. **Report Time:** Select the time to trigger the tag expiration alarm. The timezone is set according to the user time zone.
**Destination**.
**Step 12:** Select **Notification Group**: The tag expiration alert is sent to the contacts configured in the selected notification group. In this step, you can select the check boxes or search for a particular group.
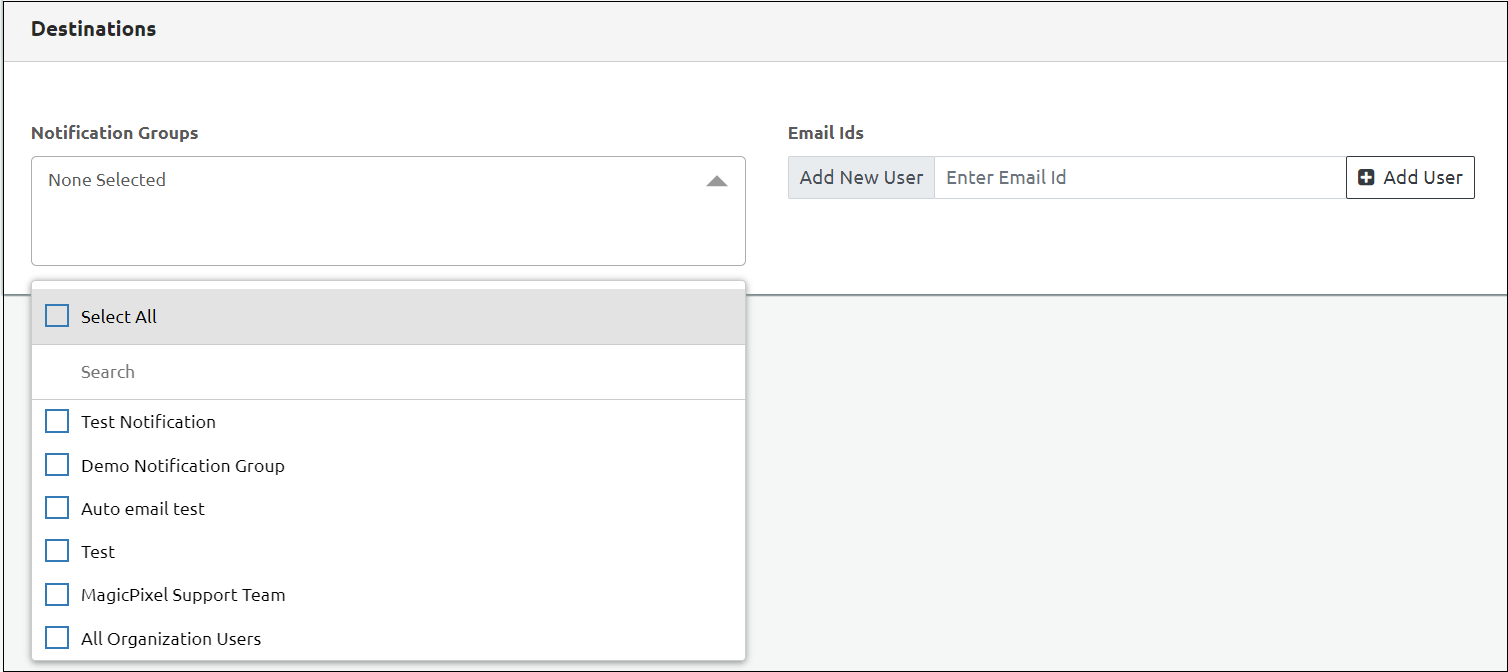
**Step 13:** Provide **Email ID**: Enter the e-mail IDs to send the tag anomaly notification. You can add users using the **Add Users** tab.
Note: You can select **Notification Groups**, **Email IDs**, or **both**, based on where you want to send the alerts.
**Step 14:** Click **Save** to save the settings.
**Step 15:** A message appears confirming that the alarm was added successfully.
---
# Agent Instructions
This documentation is published with GitBook. GitBook is the documentation platform designed so that both humans and AI agents can read, navigate, and reason over technical content effectively. Learn more at gitbook.com.
## Querying This Documentation
If you need additional information that is not directly available in this page, you can query the documentation dynamically by asking a question.
Perform an HTTP GET request on the current page URL with the `ask` query parameter, and the optional `goal` query parameter:
```
GET https://docs.ingestlabs.com/tag-manager/alarms/add-a-new-alarm-tag-expiration-alarm.md?ask=&goal=
```
`ask` is the immediate question: it should be specific, self-contained, and written in natural language.
`goal` is optional and describes the broader end goal you are ultimately trying to accomplish on behalf of the user. GitBook uses it to tailor the answer towards what is most useful for that goal.
The response will contain a direct answer to the question and relevant excerpts and sources from the documentation.
Use this mechanism when the answer is not explicitly present in the current page, you need clarification or additional context, or you want to retrieve related documentation sections.